
Smart Home Security Systems: Complete Guide to Choosing, Installing, and Maintaining Protection
Quick takeaway: Smart home security systems combine sensors, cameras, automation, and monitoring to protect your home while adding convenience. This guide walks you through how to choose the right system, install and integrate devices, optimize for privacy, and maintain long-term security — with cost estimates, real-world examples, and actionable next steps.
Introduction
Smart home security has moved from niche to mainstream. Recent studies show that homeowners with visible smart security devices report fewer break-ins and greater peace of mind. Whether you’re a renter wanting a simple plug-and-play solution or a homeowner planning a professionally monitored installation, understanding the choices and trade-offs is essential.
This article explains everything you need: the core components of smart security systems, how to select devices and platforms, step-by-step installation and integration guidance, best practices for privacy and cybersecurity, realistic cost breakdowns, and maintenance strategies that keep your system reliable year after year. Read on to choose and maintain the system that fits your lifestyle, budget, and security needs.
What Is a Smart Home Security System?
A smart home security system uses connected devices — such as cameras, sensors, smart locks, and alarms — coordinated by a hub or cloud platform to detect threats, notify you, and sometimes call responders. Key features include remote monitoring, automation rules, app control, and integration with voice assistants.
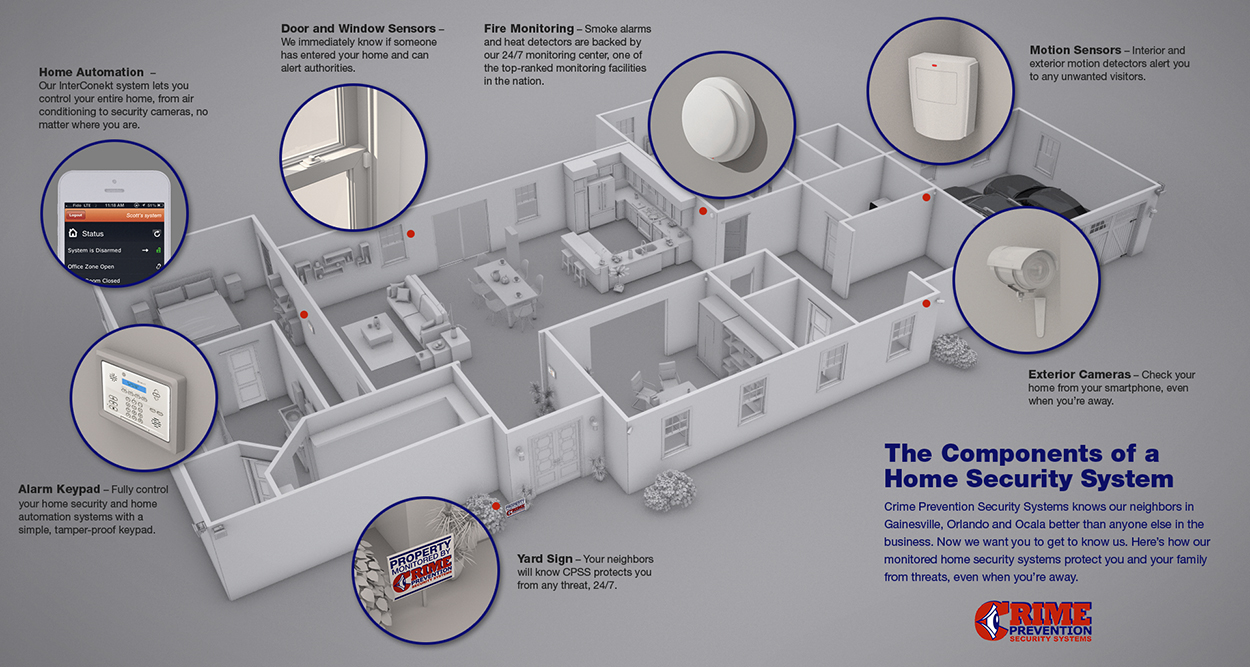
Core Components
* Security hub or app: Central controller or cloud account that manages devices.
- Entry sensors: Door/window sensors that detect openings and closings.
- Motion detectors: Infrared or radar sensors that detect movement.
- Security cameras: Indoor/outdoor cameras with live view and recording.
- Smart locks: Keyless entry with remote locking/unlocking and access logs.
- Alarms and sirens: Audible alerts to deter intruders.
- Environmental sensors: Smoke, CO, water-leak, and temperature sensors.
- Automation: Set routines to turn on lights or lock doors when away.
- Evidence collection: Video clips and logs aid investigations.
- Scalability: Add sensors and devices over time as needs change.
- Dependence on Wi‑Fi or cellular networks; backups may be needed.
- Potential privacy concerns with cloud-based vendors.
- Do you want professional monitoring or self-monitoring? Professional monitoring adds monthly fees but passes alarm handling to a 24/7 team.
- How many access points (doors/windows) and critical areas do you have? This determines sensor count.
- Is outdoor coverage required? Outdoor-rated cameras and weatherproof sensors add cost.
- Do you want home automation integration (Alexa, Google, HomeKit)? Choose compatible ecosystems.
- What’s your budget for upfront cost and monthly fees? Expect to pay $150–$700 for DIY starter kits, and $20–$50 monthly for professional plans.
- Outdoor cameras: Weatherproof (IP66 or higher), night vision, motion detection, wired power or long battery life. Example: 2–4K cams for driveways and main entrances.
- Indoor cameras: Smaller field of view for living areas; consider privacy shutters for bedrooms.
- Doorbell cameras: Combine visitor intercom and motion-triggered recording for the front door.
- Compatibility with deadbolt hardware and your door thickness
- Backup physical key option
- Battery life and low-battery alerts
- Integration with voice assistants and automation
- Check Wi‑Fi coverage: Use a Wi‑Fi analyzer app; add a mesh Wi‑Fi or dedicated security AP if signal is weak.
- Install hub and configure account: Place the hub centrally and follow the manufacturer’s app setup.
- Mount sensors and cameras: Use included templates and recommended heights; aim cameras for clear lines of sight.
- Test each device: Arm system in “home” and “away” modes, trigger sensors and verify alerts and recordings.
- Set up automations: Create rules (e.g., turn lights on when motion detected at night).
- Enable two-factor authentication (2FA) and change default passwords.
- Exact device list and placement plan
- Warranty and maintenance terms
- Monitoring contract length and cancellation terms
- On-site network security measures and whether installers will access your Wi‑Fi credentials
- Amazon Alexa — voice control and routines
- Google Home — voice and automation with Google Assistant
- Apple HomeKit — emphasizes privacy and strong encryption
- Home Assistant — powerful, self-hosted automation for advanced users
- Change default usernames and passwords immediately; use a password manager for complex passwords.
- Enable two-factor authentication on all vendor accounts.
- Keep device firmware up to date and enable automatic updates where possible.
- Disable unused services (e.g., UPnP, remote access) unless you need them and understand the implications.
- Position cameras to avoid neighbors’ windows and private areas like bathrooms and bedrooms.
- Use privacy zones and masking features to block sensitive areas from recording.
- Review vendor privacy policies for data retention, sharing, and law enforcement requests.
- Check battery levels in wireless devices and replace as needed.
- Inspect camera lenses for dirt and adjust fields of view if vegetation has grown into view.
- Review access logs and video clips for unusual activity.
- Update device firmware and the hub/app software.
- False motion alerts: adjust sensitivity, create activity zones, enable person detection if available.
- Camera recording gaps: verify storage capacity, check retention settings, and ensure power reliability.
- Do not point cameras at neighbors’ private areas (windows, backyards) without consent.
- Be aware that audio recording may be subject to one- or two-party consent laws; disable audio if unsure.
- Notify guests if you’re recording in private or shared spaces when appropriate.
Why Choose a Smart System? Benefits and Trade-offs
Smart security systems offer convenience, remote control, and automation not possible with traditional systems. They can reduce false alarms through smarter detection, integrate with other smart-home features (lighting, thermostats), and provide detailed event history and video evidence.
However, there are trade-offs: reliance on internet connectivity, subscription fees for cloud storage and monitoring, and increased attack surface for cyber threats. Knowing these helps you plan mitigations and choose the right provider.
Key Benefits
1. Remote monitoring: Check live video and system status from anywhere.
Common Trade-offs
* Subscription costs for video history and professional monitoring.
How to Choose the Right Smart Home Security System
Choosing a system requires balancing budget, technical comfort, level of desired protection, and whether you want self-monitoring or professional monitoring. Use this decision flow to narrow options quickly.
Decision Flow: 6 Questions to Ask
1. Do you rent or own? Renters often prefer non-invasive, wireless systems.
System Types and When to Use Them
| System Type | Best For | Pros | Cons |
| :— | :— | :— | :— |
| DIY Smart Kits (e.g., Ring, SimpliSafe) | Renters, small homes | Easy install, no contract, affordable | Limited customization, potential cloud fees |
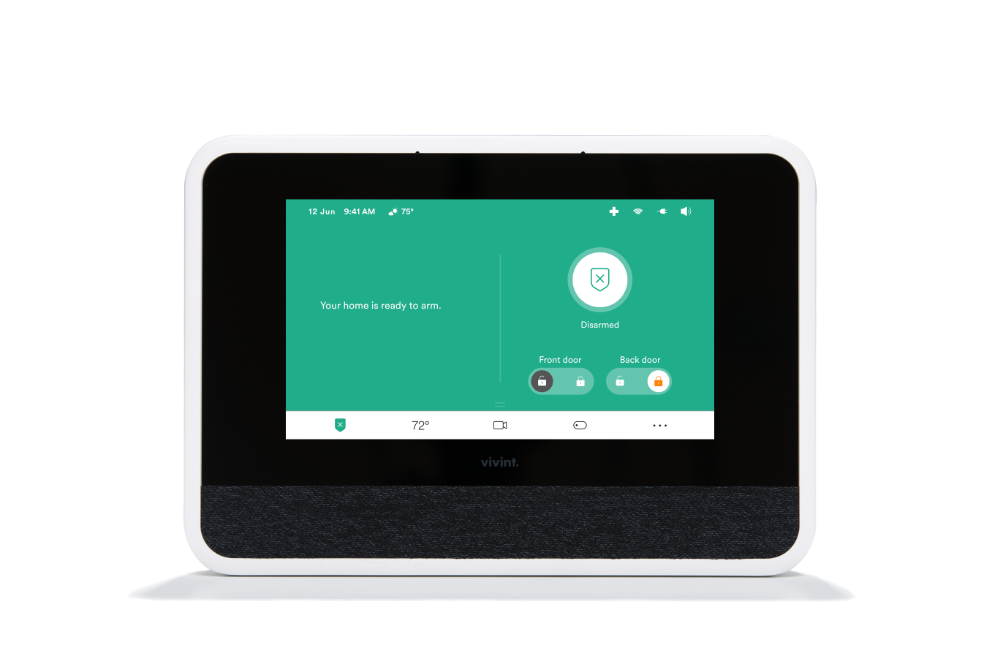
| Professional Systems (e.g., ADT, Vivint) | Large homes, high-security needs | Professional install, 24/7 monitoring, integrated sensors | Contracts, higher cost |
| Self-hosted/Home Assistant | Tech-savvy users, privacy-focused | Full control, no subscription, extensive automation | Complex setup, maintenance required |
| Hybrid (DIY + optional pro monitoring) | Flexible users who want both | Customizable, optional monitoring | Can be more expensive initially |
Device Selection: What to Buy and Why
Select devices based on priority areas, connectivity, and compatibility. Below are recommended categories and examples that illustrate typical choices.
Security Cameras
Choose cameras by location and purpose:
Consider storage: local (microSD/NVR) vs cloud. Local storage reduces monthly fees but may be vulnerable if the device is stolen.
Entry Sensors & Motion Detectors
Entry sensors are inexpensive and effective for doors and windows. Use motion detectors to cover large interior spaces. For pets, choose pet-immune PIR sensors or set motion zones to avoid false alarms from animals.
Smart Locks & Access Control
Smart locks provide remote access and audit trails. Key considerations:
Environmental Sensors
Don’t overlook smoke, CO, and water-leak sensors — they prevent damage and save lives. Many systems integrate these sensors so alarms trigger notifications and automation (e.g., shut off water valves).
Installation and Integration: Step-by-Step
Installation varies by system type. Below are streamlined steps for DIY systems and professional installations, followed by integration tips with smart-home ecosystems.
DIY Installation Steps
1. Plan sensor placement: Map all doors, ground-floor windows, garages, and main interior corridors.
Professional Installation Tips
If choosing a professional installer, confirm these before scheduling:
Integration with Smart-Home Platforms
Integration provides convenience and broad automation. Popular ecosystems include:
Check device compatibility lists before purchase and prefer devices supporting open standards (Zigbee, Z-Wave, Matter) for future-proofing.
Privacy and Cybersecurity Best Practices
Smart security systems can improve safety but create digital risks if not properly secured. Apply these best practices to protect your privacy and network.
Network and Device Security
* Use a separate Wi‑Fi network (guest SSID or VLAN) for IoT devices to isolate them from your main devices.
Video Privacy Controls
Minimize invasive monitoring and respect household privacy:
Costs and Budgeting: Realistic Estimates
Budget planning should separate upfront hardware costs from ongoing subscription and maintenance costs. Below are typical ranges for common scenarios.
Typical Cost Breakdown
| Item | Upfront Cost | Monthly/Annual Costs |
| :— | :— | :— |
| Entry-level DIY kit (hub + 3 sensors) | $150–$300 | $0–$10/mo for cloud storage |
| Comprehensive DIY system (cameras, locks, sensors) | $400–$1,200 | $5–$20/mo per device for storage/monitoring |
| Professional monitored system | $500–$2,500 (install) | $20–$50+/mo monitoring |
| Self-hosted NVR + cameras | $600–$2,000 | $0–$10/yr (power, storage maintenance) |
Value Considerations
Subscriptions often include cloud storage, professional monitoring, and advanced features like person detection. If you prefer privacy and lower long-term cost, a self-hosted solution pays off but requires technical investment. Hybrid models let you mix approaches: local recording with optional cloud backup for critical events.
Real-World Examples & Case Studies
These short case studies illustrate common choices and outcomes:
Case Study 1: The Urban Renter
A renter in a third-floor apartment chose a battery doorbell camera, two indoor plug-in cameras, and a smart lock. The system required no drilling for the landlord, used a mesh Wi‑Fi extender, and cost under $500 upfront with no monitoring subscription. The renter used motion zones to reduce notifications and shared temporary smart-lock codes with guests. Result: improved parcel security and remote access control.
Case Study 2: The Suburban Homeowner
A family in a suburban house installed six cameras (two outdoor), window/door sensors, monitored smoke/CO detectors, and professional monitoring. They integrated lights to turn on when alarms triggered. Upfront cost was ~$2,000 with a $25/month monitoring fee. A recorded incident led to police response with video evidence — demonstrating the value of monitored alerts and cloud video.
Case Study 3: The Privacy-Conscious DIYer
A tech-savvy owner deployed Home Assistant on a mini PC, Zigbee sensors, and an NVR for cameras. They avoided cloud subscriptions, storing video locally on encrypted drives and using a separate VLAN for devices. While initial configuration took time, monthly cost dropped dramatically and privacy controls were maximized.
Maintenance and Troubleshooting
Ongoing maintenance ensures your system works when needed. Create a simple quarterly checklist to prevent failures and false alarms.
Quarterly Maintenance Checklist
* Test all sensors and cameras; verify alert delivery to your phone and any monitoring provider.
Common Troubleshooting Steps
1. Device not connecting: reboot router and device; check Wi‑Fi SSID and password; move closer to hub to test connectivity.
Legal and Neighborhood Considerations
Laws regarding video surveillance and audio recording vary by jurisdiction. As a rule:
FAQs: Quick Answers for Common Questions
Do I need professional monitoring?
Not always. Self-monitoring suits many homeowners who can respond to alerts quickly. Professional monitoring reduces responsibility and can dispatch emergency services when you cannot, but it carries monthly fees.
Are smart cameras safe from hacking?
No device is immune, but following cybersecurity best practices — strong unique passwords, 2FA, network segregation, and timely firmware updates — significantly reduces risk.
What is the best practice for camera placement?
Prioritize entrances, main living spaces, and blind spots. Place outdoor cameras above eye-level to avoid tampering and ensure they cover approach paths and license plate angles if monitoring driveways.